You are currently browsing the tag archive for the ‘back-to-school’ tag.
 So most of us are officially Back-to-School. For some sensory kids, there can be a “honeymoon period” when the excitement of the new school year keeps them engaged, on-task, and connected. For other sensory kids, feeling overwhelmed and / or forgetting things begins immediately. Thankfully, we can make simple but powerful visuals to help them prioritize and remember important items in a fun and memorable way.
MAKE A VISUAL WORTH REMEMBERING:
1) Prioritize:
Identify the top 3 things that your child seems to be forgetting and then pick the one that has the biggest impact on their learning right now. This is where you start. For example, if your child is forgetting their baseball cap or their glasses, you start with helping them remember their glasses.
2) Choose an Image with Impact:
This is where you can tap into a fascination for your child – something they love and naturally connect with that will draw them in. Studies show that the more silly and outrageous we make it, the more memorable it will be!
3) Tap into Slogans:
Once you have an image, doctor it up adding in the item you are looking to help your child remember. Use popular slogans to help make the text powerful and easy to remember.
4) Make it Big and Let It Hit ‘Em in the Eyes
Print out the image / text visual, laminate it or put it in a sheet protector and hang on the door (at eye level) your child uses when they leave for school.
After success with the visual, you can drop the text and just leave the image or vice versa. Sometimes, you can switch to using the verbal prompt only “Got Glasses”. If your child has a hard time bringing their glasses back home from school, you could make a mini-visual of the picture only to hang in their cubby or locker as a prompt when packing up their backpack.
This visual example is one I made for a child I was working with who was struggling with remembering to bring her glasses to school. She loved dogs and loved her milk. So we took a picture of her dog wearing glasses and used the “Got Milk” slogan in the visual. When we support one item with a fascination, a catchy slogan, and add in alittle outrageous fun, we can help our kids remember. Keeping it simple but fun makes all the difference. Simple changes for more peaceful days ~
 A big part of supporting the Back-to-School transition has nothing to do with school — it happens in the many transitions at home around preparing for school. The morning transition can be one of the more challenging transitions as many of our rigid, anxious, or distracted kids have a hard time waking up in the morning, have anxiety about school in general, and/or know they will be working hard to pay attention and hold it together for the next 6 hours. Our goal is to make their mornings easier so they have more energy and willpower for the experiences where they will need it at school.
THE DRESSING STATION
One way we can support a structured, simplified morning is to create a Dressing Station. This allows us to break the dressing task into 2 steps:
1) Evening Step: Pick out and put clothes in the dressing station the night before (this simplifies the morning and also helps our sensory kids begin the cognitive shift to school coming the next day).
2) Morning Step: In the morning, go to dressing area and get dressed.
A dressing area supports many rigid, anxious, or distracted behaviors.
– It helps our rigid child simplify a transition to an undesired task (school!).
– It helps our anxious child create a routine which will help calm and support their transition to something that might feel overwhelming (school!).
– It helps our distracted child stay on task with a simplified, visual plan to complete a task.
WHY THIS WORKS
– It does the first step (and often hardest step for many sensory kids) of gathering supplies into one area and sequencing the task.
– We’ve broken down the task into manageable pieces.
– We’ve created a visual checklist of sorts with the 1,2,3 Labels / Picture Images.
– It can grow with your kids. As they get older, you can remove the visual supports. You can transition from images to numbers 1,2,3 and then to no visual supports besides the hooks or the chair.
THREE TYPES OF DRESSING STATIONS
* A 1,2,3 Bin System:
This works well for younger kids learning to dress and can be portable!
* A Hook System:
Can use with images, numbers or just have your child hang each item of clothing separately in order. A bag on a hook can hold socks / shoes.
* A Chair Station:
You can use duck tape to mark sections on the chair, have a basket under the chair to hold shoes and socks, or just pile everything on the chair (sometimes too much structure is just too much!).
*** For kids who might need to tap into the Power of Choice to stay regulated with this task, think about having 2 Dressing Stations – A Hook System and A Chair Station. If they are having a hard time doing step one (picking out clothes the night before), you can give them a choice of which dressing station to use – this might help get them over the hump.
SUPPLIES
– Bins for the 1,2,3 Bin System. These bins in this example are from Ikea – http://www.ikea.com/us/en/catalog/products/20163265/
– Row of Hooks – Can attach to a wall (make sure your hang at the right height for easy access to hooks and images / numbers) or if you child is tall enough, you can use Over-the-Door row of hooks. A Row of Hooks with 3 or 4 hooks works best. Here’s an example from Lowe’s – http://low.es/1mlueGC
– Picture Images: Take your own pictures of your real life tasks, pictures from magazines, stock photos, or image software like Boardmaker – http://www.mayer-johnson.com/boardmaker-software/ , Picture Exchange Communication System – http://www.pecsusa.com/ , or Do 2 Learn (can sign-up for an annual membership on Do 2 Learn!) – http://www.do2learn.com/
– A Chair: One that has a design of “hook” corners or a flat top is best – 1) undergarments on seat of chair, 2) top on Left side of chair, 3) bottom on Right side of chair, and 4) shoes and socks under chair.
– Labels: Adhesive labels for a 1,2,3 visual support if needed.
– Small Binder Clips to attach labels to Bins.
– Optional: Laminating Machine to protect picture images.
Break it down, eliminate distracting stimuli, and create a visual support or a system. Try one of these easy Dressing Stations for a smoother morning transition. Sensory Organizing = Making Space for Life ~


 A big part of supporting the Back-to-School transition has nothing to do with school — it happens in the many transitions at home around preparing for school. It happens in the morning as our kids get ready for the day at school and/or in the afternoon / eventing as our kids prepare for the next day at school. These many transitions and tasks at home are also where small changes and simple supports can be a powerful tool for our sensory kids.
The morning transition can be one of the more challenging transitions as many of our rigid, anxious, or distracted kids have a hard time waking up in the morning, have anxiety about school in general, and/or know they will be working hard to pay attention and hold in together for the next 6 hours. Our goal is to make their mornings easier so they have more energy and willpower for the experiences where they will need it at school.
Supporting Morning Bathroom Routines
Knowing that our kids are working through a challenging transition, let’s use our core Sensory Organizing tools and break it down, eliminate distractions, and create a visual guide.
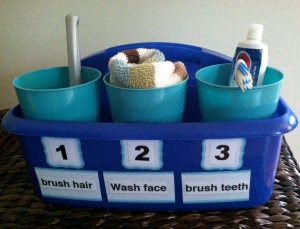
The Bathroom Caddy
Supplies
– A Simplified bathroom routine – only include what has to be done in the morning.
– A Caddy (that can get wet!). This one is from Lakeshore Learning but they can be found at any home store.
– 3 Plastic Cups to help separate and categorize the tasks. These came in a package of 3 from Walmart. Just make sure they fit snugly in the caddy
– Labels to number the tasks in order and to spell out task in simple terms. I found mine at Staples from Martha Stewart Home Office with Avery.
– Clear packing tape to put over labels to protect from water.
– For extra support, you could add a laminated Morning Routine Checklist and hang it on the wall or mirror in the bathroom.
***Put in the order that make sense for your child not what makes sense to you. If they like to wash their face before they brush their teeth, so be it.
Why This Works
– It does the first step (and often hardest step for many sensory kids) of sequencing the task so they know where and how to start.
– We’ve broken down the task into 3 manageable pieces.
– We’ve batched the supplies needed in the order which will help our sensory kids stay on task.
– We’ve created a visual checklist of sorts with the 1,2,3 Labels.
– We’ve made it portable. If our child if having a more challenging morning and we need to change locations or need to give them a choice in what sink they use to do their bathroom routine, this allows us to do that.
Start now with simple this morning support. Practice and adjust as needed so you know what works best for your sensory child. Small Changes for more Peaceful School Mornings ~
 For me, Back-to-School has a slightly different time line. It’s not a full court press for the month August running from store to store and having everything labeled, stocked and ready to go. Why? Because that’s not how most sensory kids (or overwhelmed adults) successfully manage a transition. Here, we need to apply the same strategies to Back-to-School as we do other sensory supports: Break it down, eliminate distractions, and create a visual guide or system (for us and for our sensory kids!). Three key ideas to remember: Focus on immediate needs only, only introduce a few things a week, and involve your child in the process.
From my experience of living with and working with sensory kids, Back-to-School is the three month, not a two-week, process. Our sensory kids are often tangible, concrete learners so preparing ahead of time for something that is not here yet often feels too abstract for them and leaves them feeling frustrated or overwhelmed. Do you know any child that really wants to make a homework station before school starts and before they actually have homework? Part of Sensory Organizing is understanding that we have to see what’s not working before we can set-up the best system to support it. So let’s simplify this Back-to-School Process for our sensory kids (and us) with a slightly different time line.
August:
Central Message Area
Morning Routines / Systems
Getting Ready for New People and Places
Simplifying Supplies
September:
Portable Homework Bin
Systems for Getting Things Home and Back-to-School Again
Weeknight Meal Planning
October:
Homework Strategies
Remembering Techniques
Visual Planning Tools
So for the next 3 Months, I’ll be working off this time line and sharing strategies, visual systems, and colorful examples that support these goals. Here’s to a little more summer and a slow but steady approach to what will be a new, messy, forgetful, frustrating school year chock-full of small victories ~
#sensoryorganzing #sensorychild #backtoschoolthesensoryway


